For the past several weeks, I’ve been learning about each individual part of a Rails application as its own entity. First, I learned how to set up a controller, and made sure via testing that all the links were routed properly. Next, I learned how embedded Ruby in the views files gets displayed to the screen. Last week was the back end with validations and Active Record. This week, I finally got to take some user input and incorporate all those things in an interactive way. The basis of the lesson was forms, how Rails generates params, and how they interact with the controller.
Here is what your typical form would look like for new user registration in HTML:
 /app/views/new.html.erb

<form accept-charset="UTF-8" action="/users" method="post" ></form> %>
   <input type="hidden" name="authenticity_token" value="<%= form_authenticity_token %>" />
   <label for="username">Username</label>
   <input name="user[username]" type="text" />
   <br>
   <label for="email">Email</label>
   <input name="user[email]" type="text" />
   <br>
   <label for="password">Password</label>
    <input name="user[password]" type="password" />
    <input name="commit" type="submit" value="submit" />
We tell the form to take "/users" as its action and "post" as its method. This means that the form will create a new User object and direct the client to the "/users" path. How does it know what to use to create this new object? Recall during the Sinatra lesson how parameters were routed from inputs using mainly the get '/' do block. It's the same principal here except we are using the POST verb. Using the name of the input, we'll establish our user object's username, email, and password. Meanwhile in the controller, we need something to accept them. Here is what that will look like:
 /app/controllers/users_controller.rb
class UsersController < ApplicationController

def new
  @user = User.new
end

def create
  @user = User.new(username: params[:username], email: params[:email], password: params[:password])
      if @user.save
        redirect_to new_user_path
      else
        render :new
      end
end

end
Within the create method, our @user takes a hash of parameters that get captured from the form inputs. If the new user gets saved with the parameters he/she puts in, a new blank form will appear. That is, if my routes are set up properly.
 /config/routes.rb
Rails.application.routes.draw do
  resources :users, only: [ :new, :create ]
end
resources :users creates a route to all the CRUD pages for users, but right now I only need new and create. Hence the only: specification. So thus far I have my routes, controller, and form set up and functioning, but the form is just pure HTML. Let's take a look at the Rails-i-fied version.
 /app/views/new.html.erb
<%= form_for @user do |f| %>
<%= f.label :username, "Username: " %>
<%= f.text_field :username, value: 'Your Name' %>

<%= f.label :email, "Email: " %>
<%= f.email_field :email, value: 'example@example.com' %>

<%= f.label :password, "Paswword: " %>
<%= f.password_field :password %>

<%= f.submit %>
<% end %>
There are couple things I like about this code. The form_for method takes a block and applies it to the @user instance variable. Therefore, the ":username", ":email", and ":password" parameters are automatically read by Rails as "user[username]" and so on. Secondly, Rails automatically generates the authenticity token for you. Third, it automatically knows to make a "post" request because @user is of class User, and the post method is the proper HTTP verb for creating a new object. Anything that takes code out of my hands is ok with me.
To finish up, I'll clean up the messy controller. The user params can be stored in their own private method to shorten the call to User.new.
 def create
        @user = User.new(user_params)
        if @user.save
            redirect_to new_user_path
        else
            render :new
        end
    end

private

def user_params
        params.require(:user).permit(:username, :email, :password)
    end
This blog post only goes into the connection between form and controller. If we wanted to redirect to a different page when saving a new user, we would need to flesh out the show method and create a view for it. All I wanted to explain here was the Rails way of writing forms and how the params interact with the controller.
May 18 2017
May 17 2017
- Began forms project
May 16 2017
- Completed micro_reddit project GitHub
- Read Rails Guide Form Helpers
May 15 2017
The Odin Project Blog Post 18
Week 18 - Active Record
Recall that Ruby on Rails applications follow a MVC (model-view-controller) flow. So far I have written about the controller and view, which leaves only the model left to be explained. In my previous blog post, I wrote about the database and how to use the Structured Query Language to access data from it. Fittingly enough, the model is where our app interacts with the database. However, after spending all that time last week learning how to make calls to a database using SQL, I found out this week that Rails uses the Active Record library and a feature called migrations to completely remove SQL from the coding process. The magic of Rails allows you to actually interact with the db using pure Ruby. Knowing that, testing the functionality of our database becomes doable via the rails console, and this week I learned about the console’s sandbox.
Before we can fire up the console, we need to create our User model, and like the creation of our controller, it all starts with the generate command. If I want my users to have a name and email upon creation, I’ll simply type into my terminal rails g model User name:string email:string. Among the files this creates is a migration in the db folder.
/db/migrate/20170510133733_create_users.rb
class CreateUsers < ActiveRecord::Migration[5.0]
  def change
    create_table :users do |t|
      t.string :name
      t.string :email

      t.timestamps
    end
  end
end
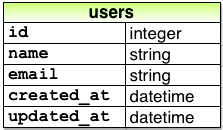
This is a Ruby representation of a SQL creation of a table. The name of the table is users, the columns are name and email, and they are both strings. The final operation, t.timestamps, is a special command that creates two more columns created_at and updated_at for when a user is created and updated. In order to run the migration and complete the process of creating the database we need to “migrate up” by entering the rails db:migrate command into the terminal. This creates a SQL file in our db directory, and a database that should look like this:
Another file that our generate command created is the actual User model, which can be found in app/models/user.rb, and looks like this:
 app/models/user.rb
    class User < ApplicationRecord

    end
This is the piece of code that inherits from the Active Record library. By firing up our rails console --sandbox in the terminal we can play around with the database without making any permanent changes to it. I can create a new user by entering:
> user = User.new(name: "kyle" email: "ksheehan@example.com")
        => #<User id: nil, name: "kyle", email: "ksheehan@example.com",
created_at: nil, updated_at: nil>
If I ask user.valid?, it will return true, because I haven't given my model any validations yet. So let's get into validations. Firstly, I want my users to have to fill in a name and email in order to get stored in the database, so this is the code I will place in my model:
class User < ApplicationRecord
    validates :name,  presence: true
    validates :email, presence: true
end
Now if I try entering a new user in my console's sandbox with a blank name or email, user.valid? and user.save will both return false, and that user will not be sent to the db. Checking the validity of presence is the most elementary validation, so let's ramp up the complexity a bit.
class User < ApplicationRecord
    before_save { email.downcase! }
    validates :name, presence: true, length: { maximum: 50 }
    VALID_EMAIL_REGEX = /\A[\w+\-.]+@[a-z\d\-]+(\.[a-z\d\-]+)*\.[a-z]+\z/i
    validates :email, presence: true, length: { maximum: 255 }, format: { with: VALID_EMAIL_REGEX }, uniqueness: { case_sensitive: false }
    has_secure_password
    validates :password, presence: true, length: { minimum: 6 }
end
This is my completed model after I've made all of my validations. Though it looks intimidating, it's written in Ruby so it reads pretty straightforward, and we'll tackle it line-by-line. Before we can address the first line, however, we have to take a look at what we added to email. Specifically, I want to draw attention to the uniqueness: { case_sensitive: false } line. This tells the database that it should only accept unique emails, and “Foo@ExAMPle.CoM” and “foo@example.com” are the same. But some database adapters use case-sensitive indices, meaning they would not treat those two emails as the same. Therefore, the first line before_save { email.downcase! } downcases the email address before saving it.
Next, we see that both name and email validate length. If name is less than 50 characters, OR email is less than 255 characters, an error message will be displayed. The messy regular expression in the middle of the model just validates that the email the user enters follows the "foo@bar.com" email address format.
Finally, we arrive at the password validations. The first line has_secure_password is a powerful method that adds a lot of new functionality. But wait, there is no password column in my database, right? Correct. Therefore, I need to create a migration for it first. rails g migration add_assword_digest_to_users password_digest:string will create the following migration:
    class AddPasswordDigestToUsers < ActiveRecord::Migration[5.0]
        def change
            add_column :users, :password_digest, :string
        end
    end
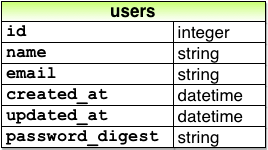
"Password_digest" is just a synonym for hashed password; meaning the password the user enters will be stored in the database as a unique bit string. This means the only way to hack an account is to brute-force search possible passwords. As usual after we create a migration we must run rails db:migrate. This will make our database appear like so:
To hash the password, there is a gem called bcrypt that needs to be added to the Gemfile and then of course bundle install will install it into the applicaton. Now that the password is digestible, I can add the validations that check for presence and length. Just to be sure, I'll go into my sandbox:
> User.create(name: "kyle", email: "ksheehan@example.com", password: "foobar", password_confirmation: "foobar")
    => #<User id: 1, name: "kyle", email: "ksheehan@example.com",
created_at: "2016-05-23 20:36:46", updated_at: "2016-05-23 20:36:46",
password_digest: "$2a$10$xxucoRlMp06RLJSfWpZ8hO8Dt9AZXlGRi3usP3njQg3...">
As you can see, I had to enter password and then confirm it by entering again. The password_digest is a huge hashed string so that even if my database is compromised, my users' passwords are safe.
May 12 2017
- Bug fixes in Caesar Cipher
- Added links to projects on personal site
May 11 2017
- Completed Modeling Users tutorial
- Bug fixes in Sinatra hangman
- Worked on personal site
May 10 2017
- Began Project: Active Record Basics
- Completed Warmup: Thinking Data First
- Began Chapter 6 of Hartl tutorial - Modeling Users
May 9 2017
- Rails Guide Active Record Associations
- Reformatted blog posts
- Created a new personal website GitHub
May 8 2017
- Updated weekly goals
- TOP Active Record section
- Rails Guide Active Record Basics
- Rails Guide Migrations
- Rails Guide Validations
The Odin Project Blog Post 17
Week 17 - Dealing With the Database and SQL
The next lily pad in my learning process is something I’ve often overlooked but is absolutely necessary to have some understanding of for building CRUD applications: the database. It’s not one of the flashy things you want to learn because the database isn’t presented to the user at any point, and for me it always seemed like a mysterious, esoteric place that I’d never want to touch. But after this week’s lesson, the SQL language is nowhere near one of the more difficult concepts I've faced. It got trickier towards the end of the project when dealing with multiple JOINs and SELECTs, but from what I understand, we will hardly need to know things like that off the top of our heads. ActiveRecord and Google can ease the burden. Like the rest of the Rails magic we’ve been learning though, it is good to have at least a vanilla understanding of SQL so that we know what is happening and how to interact with our database.
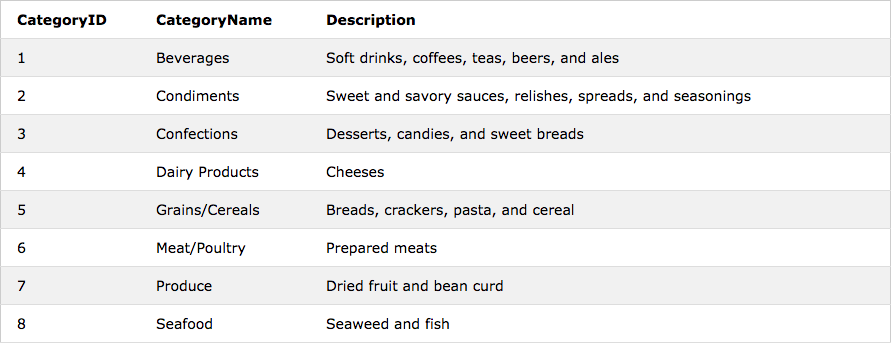
The first step in a CRUD application is Create. Therefore, let’s look at creating a table in SQL. For this post, I will use a very simple example. It will be a three-column table containing information that you might see as a restaurant's inventory. If I type into my editor create table Categories (CategoryID int, CategoryName varchar, Description varchar);, I’m going to get three column headers.

In order to fill the table, I'll use the insert into syntax. This is the the (U)pdate part of our CRUD app. The CategoryID will automatically be filled with an integer so I don't need to worry about that, but the CategoryName will take a string (varchar) and so will the Description. In all, my code will look something like this:
insert into Categories
(CategoryName, Description)
values ('Beverages', 'Soft drinks, coffeees, teas, beers, and ales')
insert into Categories
(CategoryName, Description)
values('Condiments', 'Sweet and savory sauces, relishes, spreads, and seasonings');
.
.
.
Now that my table is filled out, we can get to the meat and potatoes of the SQL language: making queries. Right now our database has three columns and eight rows. In order to (R)ead the database, we need to select items from our table using the SELECT * from Categories operation. This specific line will simply return all (*) the items from our table. But we can be far more specific. For example, if we want the name and description of just produce, beverages and meat, we can type SELECT CategoryName, Description FROM Categories
WHERE CategoryName IN ('Produce', 'Beverages', 'Meat/Poultry') and we'll get back:

Calls to the database will pretty much always follow the same syntax. You first tell the db you want to select something, and then you specify from what table you are making the selection. Your options are almost endless as far as what you can retrieve. I'll use solutions from the SQL Zoo tutorials to describe more complicated examples, because the Categories table just isn't large enough.
SELECT player, teamid,coach, gtime
  FROM goal JOIN eteam ON (teamid=id)
 WHERE gtime<=10
One of the trickier but more useful actions SQL can perform is joining tables together and making queries from the newly compounded info. The code above uses the JOIN keyword to link together a table called "goal" and a table called "eteam" ON their matching columns. In this case the "teamid" from goal and "id" from eteam match up, so the tables fit together. The query I've made is to select the player, teamid, and gtime(game time) from goal and the coach from eteam, for every goal scored before the 10th minute. When the code is run, I will get back a four-columm table with all gtimes under 10. I could go on and on describing different examples of queries, but actually coding them is far better practice than writing or reading about them.
Having mentioned the C, R, and U, for the sake of continuity I feel obligated to at least mention the D in CRUD. None of the resources spent much time on deletion, and that's probably because it's almost identical to select. Let's return to the Categories table I created earlier. If I DELETE from Categories WHERE CategoryID = 1, the entire first row will be wiped from the database. Like querying, we can use WHERE to make conditions for deletion, and if we do not, everything from the specified table will be deleted.
Simple examples, but the conditions entered can make things more complex. Next week I will learn about Active Record and how that fits into the application structure.
May 3-4 2017
- Worked on and completed SQL Zoo tutorials GitHub